Check out our golf rangefinders by Vovex to elevate your game!
Disconnecting your golf cart batteries is a routine maintenance task that every golf cart owner should know how to perform safely and correctly. Whether you're preparing for seasonal storage, replacing batteries, or performing maintenance on your cart, proper disconnection prevents accidents and extends battery life.
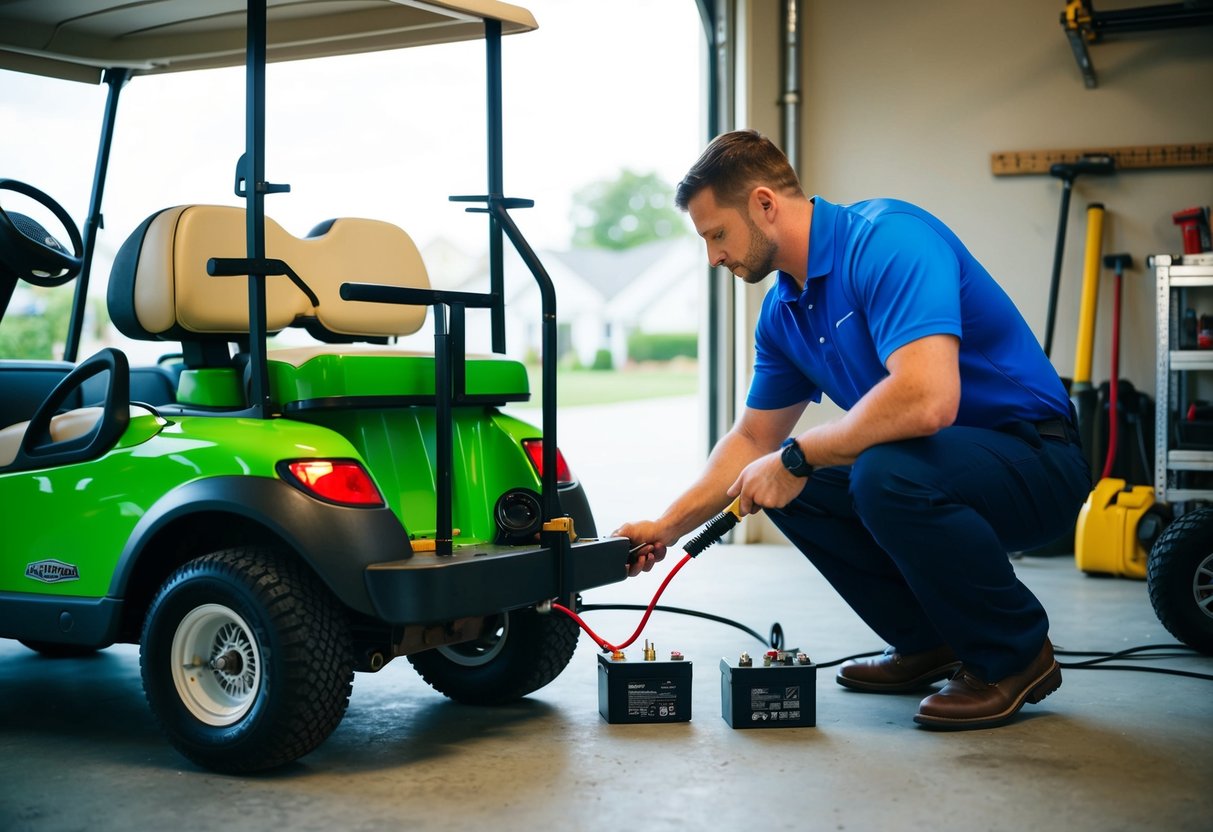
Properly disconnecting golf cart batteries requires turning off all accessories, wearing safety equipment, and removing the negative terminal connection first to prevent electrical shorts. Many golf enthusiasts overlook this critical step, potentially causing damage to their cart's electrical system or creating safety hazards that could easily be avoided with the right approach.
We've been maintaining golf carts for years and understand that battery disconnection might seem intimidating at first. But don't worry – the process is straightforward once you know what you're doing, and we'll guide you through each step to ensure your cart stays in prime condition for your next round.
Key Takeaways
- Always wear protective gear and disconnect the negative terminal first to prevent electrical shorts and potential injuries.
- Different golf cart models have varying battery configurations, so identify your specific type before beginning the disconnection process.
- Regular battery maintenance including proper disconnection can significantly extend battery life and improve cart performance on the course.
Safety First
Disconnecting your golf cart batteries might seem straightforward, but prioritizing safety prevents serious injuries and damage to your equipment. Taking proper precautions before starting any battery-related task is essential.
Wear Protective Gear
Always wear safety glasses to protect your eyes from potential acid splashes or debris. Battery acid can cause severe damage to your eyes and skin.
We recommend using insulated rubber gloves that are specifically designed for electrical work. These protect your hands from both acid exposure and electrical shocks.
Long sleeves and long pants provide additional protection for your skin. Even small amounts of battery acid can cause painful burns.
Remove all metal jewelry before working on batteries. Rings, watches, and bracelets can conduct electricity and create dangerous short circuits.
Keep a container of baking soda and water nearby. This mixture neutralizes battery acid spills and should be applied immediately if acid contacts skin or clothing.
Understanding Battery Hazards
Golf cart batteries produce hydrogen gas during charging, which is highly flammable. Never smoke, create sparks, or bring open flames near batteries.
We've seen many preventable accidents from improper battery handling. Always work in well-ventilated areas to prevent gas buildup.
Battery terminals carry electrical current that can cause shocks or burns. Use insulated tools whenever possible to minimize this risk.
Be aware that batteries are heavy (typically 50-70 pounds each). Use proper lifting techniques to avoid back injuries.
Short circuits can cause batteries to overheat or explode. Always disconnect the negative terminal first and reconnect it last to prevent this dangerous situation.
Water levels in batteries are critical for safety and performance. Low electrolyte levels can damage batteries and create unstable conditions.
Preparing for Disconnection
Before tackling any battery disconnection project on your golf cart, proper preparation is essential for both safety and efficiency. Setting up correctly will save you time and prevent potential hazards.
Gathering Necessary Tools
We recommend assembling all necessary tools before starting the battery disconnection process. You'll need a set of insulated wrenches (typically 1/2" or 9/16") that match your battery terminal size. Protective gloves and safety glasses are absolutely essential when working with batteries to protect against acid and accidental sparks.
A battery terminal puller can be helpful for stubborn connections, though not always necessary. Keep a wire brush handy for cleaning corrosion from terminals. We also suggest having baking soda and water in a small container to neutralize any acid spills.
Don't forget to bring a digital camera or smartphone to take photos of the battery configuration before disconnection. This simple step has saved us countless headaches during reassembly.
Locating the Battery Compartment
Most golf carts house their batteries under the seat or in a designated rear compartment. In Club Car models, we typically find the battery bank under the seat which lifts up for access. For E-Z-GO carts, the batteries are often located beneath the rear-facing seat or cargo area.
Yamaha golf carts usually position batteries under the seat or sometimes in a front compartment. Before attempting to access the compartment, ensure your cart is:
- Parked on level ground
- Turned completely off
- Secured with the parking brake
The compartment might be secured with latches, screws, or quick-release mechanisms. We recommend consulting your owner's manual if you're having trouble locating or accessing your battery compartment.
Identifying Your Golf Cart Battery Type
Before disconnecting your golf cart batteries, it's essential to know exactly what type of battery system you're working with. Different battery technologies require specific handling procedures for safe disconnection and maintenance.
Lead-Acid Batteries
Lead-acid batteries are the traditional power source for most golf carts. You'll recognize these by their heavy weight and plastic casing with removable caps on top for water maintenance.
These batteries typically have six cells and voltage markings of 6V, 8V, or 12V clearly stamped on the casing. When inspecting lead-acid batteries, check for terminals marked with a red plus (+) sign and a black minus (-) sign.
Most lead-acid golf cart batteries are arranged in series connections using thick cables and have accessible terminal posts. We recommend wearing gloves when handling these as they contain sulfuric acid that can cause burns if the battery is damaged.
Regular maintenance is required for these batteries, including checking water levels and cleaning corrosion from terminals. If you see white powdery substance around the terminals, that's corrosion that needs cleaning before disconnection.
Lithium-Ion Batteries
Lithium-ion batteries are becoming increasingly popular in newer golf cart models. They're significantly lighter than lead-acid counterparts and feature a sealed case with no maintenance ports for adding water.
You can identify lithium batteries by their clean, often rectangular design with built-in Battery Management Systems (BMS). These batteries typically have fewer visible cables and might include LED indicators showing charge status or battery health.
The terminals on lithium batteries are often better protected and less prone to corrosion. We find these batteries commonly have voltages of 48V or higher, with the voltage usually marked clearly on the casing.
Lithium batteries require special handling during disconnection as they maintain charge even when appearing depleted. Never use metal tools that could bridge terminals, as lithium batteries can deliver high current instantly if shorted.
Disconnecting the Batteries
Proper disconnection of golf cart batteries is crucial for safety and maintenance. The process requires careful handling of connections and battery cables to prevent damage to your equipment and avoid personal injury.
Removing Connections
Start by identifying the negative terminal, which typically has a black cable and a minus (-) symbol. We always disconnect the negative terminal first to reduce the risk of shorts or sparks. Use an insulated wrench to loosen the nut on the negative terminal, being careful not to let the wrench touch both terminals simultaneously.
Once loosened, lift the cable away from the terminal and secure it so it doesn't accidentally make contact again.
Next, move to the positive terminal (red cable with plus (+) symbol) and repeat the process. Some golf carts have multiple batteries connected in series, so work methodically from one end of the battery bank.
For carts with four to six batteries, we recommend taking photos before disconnection to remember the exact configuration for reassembly.
Handling Battery Cables
Always inspect battery cables for corrosion when disconnecting them. White, green, or blue powdery substances indicate corrosion that should be cleaned before reconnection.
Grasp cables by their insulated portions, never by the metal connectors. Store disconnected cables away from metal surfaces to prevent unintended electrical contact.
If cables show signs of fraying or damage, now is the perfect time to replace them. Fresh cables ensure better electrical flow and prevent future issues with your cart's performance.
Consider using anti-corrosion washers or terminal protectors when you eventually reconnect the batteries. These inexpensive additions can significantly extend the life of your connections and improve reliability on the course.
Proper Battery Removal Techniques
Removing golf cart batteries requires careful attention to both safety and technique to prevent injury and ensure longevity of your equipment.
Lifting Batteries Safely
Golf cart batteries are surprisingly heavy, often weighing between 50-70 pounds each. Always wear thick gloves and closed-toe shoes before attempting to handle them. We recommend using a battery carrier strap or handle that fits securely around the battery case.
Never lift batteries by their terminals as this can damage them permanently. Instead, grip the built-in handles or use a battery lifting tool specifically designed for the task.
When removing multiple batteries, work with a partner if possible. Proper lifting technique is crucial - bend at the knees, keep your back straight, and lift with your legs. Avoid twisting while holding batteries.
Place removed batteries on a wooden pallet or rubber mat rather than directly on concrete, as concrete can accelerate discharge.
Cleaning Battery Terminals
Before disconnecting, take photos of the battery configuration to ensure correct reconnection later. Use a battery terminal cleaning tool or wire brush to remove corrosion from terminals. A mixture of baking soda and water (one tablespoon per cup) works effectively for stubborn buildup.
Spray the solution onto corroded areas and let it fizz, which indicates it's neutralizing the acid. Wipe clean with a disposable cloth.
For safety, always:
- Wear protective eyewear and rubber gloves
- Disconnect the negative terminal first, then positive
- Keep metal tools from touching multiple terminals simultaneously
- Apply a thin layer of petroleum jelly or terminal protectant spray after cleaning
Clean terminals ensure optimal power transfer and prevent resistance that can damage your golf cart's electrical system.
Frequently Asked Questions
Battery maintenance and replacement are crucial aspects of golf cart ownership. Proper procedures ensure safety, performance, and longevity for your vehicle's electrical system.
What is the proper sequence for disconnecting 48 volt golf cart batteries?
When disconnecting 48-volt systems, we always start with the negative cable from the battery pack. This prevents potential short circuits during the removal process.
Next, disconnect the positive cable from the battery pack. After the main connections are removed, we can safely disconnect the interconnecting cables between individual batteries.
Always wear insulated gloves and use proper tools with rubber-coated handles to prevent accidental electrical contact. Remember to label all connections before removal if you're not familiar with the setup.
Can you walk me through replacing a golf cart's batteries with lithium ones?
First, disconnect and remove the old lead-acid batteries following proper safety protocols. Clean the battery tray thoroughly to remove any acid residue or corrosion.
Install the new lithium batteries according to the manufacturer's specifications, as their configuration may differ from lead-acid batteries. Most lithium systems require a specific battery management system (BMS) for safe operation.
Connect the batteries in the proper sequence, typically linking positive to negative terminals between batteries to achieve the required voltage. Finally, connect the main positive and negative cables to complete the circuit.
What's the safest method to change a battery in a gas golf cart?
Turn off the ignition and remove the key before starting any battery work. Disconnect the negative terminal first, followed by the positive terminal.
Clear any corrosion from the battery tray and cable ends using a baking soda solution. This neutralizes any acid residue and prevents future corrosion issues.
Install the new battery in the same position as the old one, connecting the positive terminal first, then the negative. This reverse order from disconnection helps prevent sparks near the battery.
Could you provide a step-by-step guide on installing new batteries in an E-Z-GO golf cart?
Remove the seat and battery covers to access the battery compartment. Disconnect all cables starting with the negative main cable, then the positive, followed by interconnect cables.
Remove the old batteries carefully and clean the battery tray thoroughly. Position new batteries in the exact configuration as the originals, referring to the wiring diagram if needed.
Connect the interconnect cables between batteries first, then attach the main positive cable, followed by the negative cable last. Check all connections for tightness and apply anti-corrosion spray to the terminals.
Is there a specific way to arrange battery connections for optimal performance in golf carts?
Series connections (positive to negative between batteries) increase voltage while maintaining the same amp-hour rating. This is the standard configuration for most golf carts.
Parallel connections (positive to positive, negative to negative) maintain voltage while increasing amp-hour capacity. Some specialized carts use a combination of series and parallel connections.
We recommend following the manufacturer's specific wiring diagram for your model. Improper battery arrangements can cause performance issues or even damage to the cart's electrical system.
How do I replace the batteries in a golf cart for a seamless forest excursion?
Plan your battery replacement at least a day before your forest trip to allow proper charging time. New batteries typically don't come fully charged and require 8-12 hours for their initial charge.
Verify the cart's range with the new batteries before heading into remote areas. A quick test drive around your neighborhood will confirm everything is functioning properly.
Pack a portable jumper or small solar charger as backup for longer excursions. Even with new batteries, unexpected terrain challenges in forest settings can deplete power faster than anticipated.